Single Loaf Basic Sourdough Bread Recipe
This single loaf basic sourdough bread recipe is simple, beginner-friendly, and made with just flour, water, salt, and sourdough starter. Perfect for everyday baking with a crisp crust and soft interior.
I love sourdough that feels like real life: practical, forgiving, and somehow a little bit magical. This Single Loaf Basic Sourdough Bread Recipe is exactly that — simple ingredients, an easy rhythm, and a dependable, delicious loaf you can make on a weekday or tuck into a weekend baking habit.
I love sharing sourdough recipes that feel approachable and practical for real family life. This single loaf sourdough is my go-to everyday bread—no complicated schedule, no extra equipment—just a reliable, delicious loaf that fits effortlessly into your week.
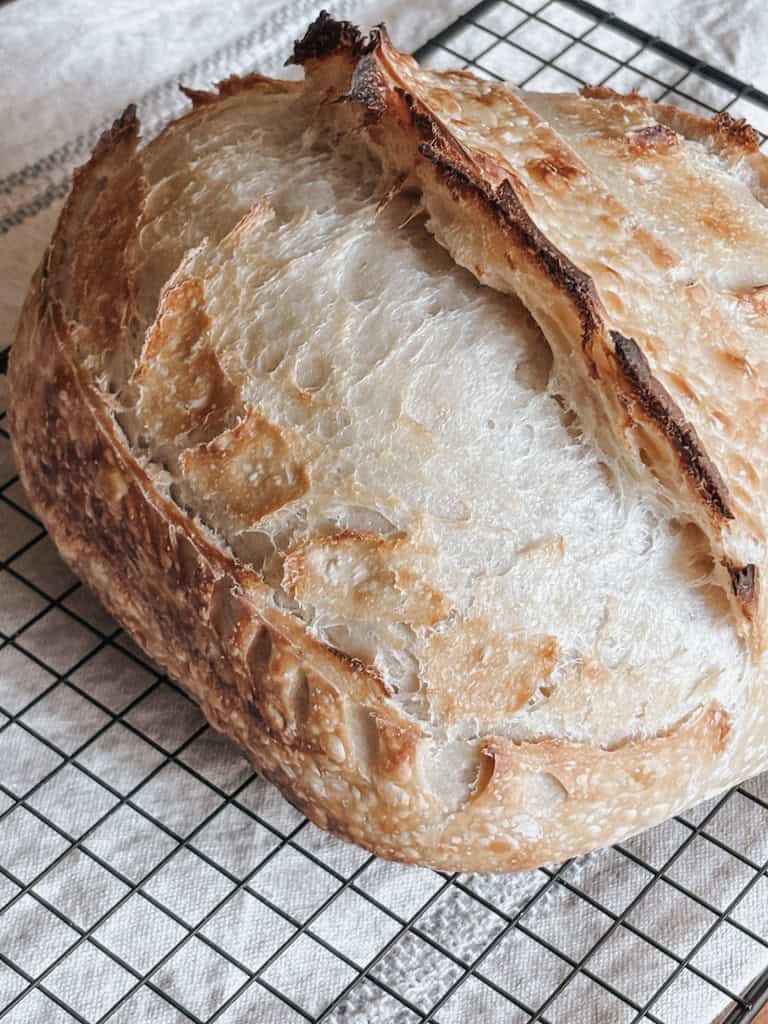
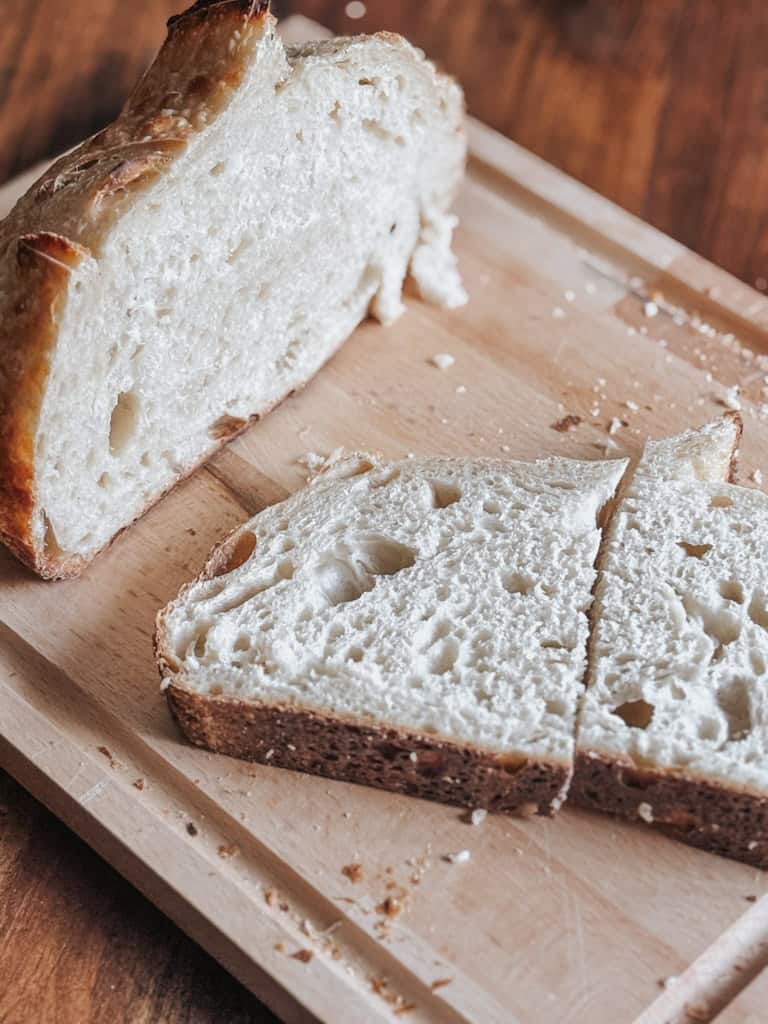
If you’re newer to sourdough (first time? first attempt? first try?), this recipe is a warm, encouraging place to start. It’s my go-to when I want fresh sourdough bread for sandwiches, toast, or a simple family dinner. With a crisp crust, a soft interior, and that familiar tang that makes homemade sourdough bread feel like something you worked at and won, it’s a great beginner sourdough recipe and also a comforting repeat for the seasoned sourdough baker.
If you want to go deeper, check out my Sourdough Course and a Free Starter Guide — perfect for getting a head start or for troubleshooting the next time your dough is sticky or slow to rise.
Why You’ll Love This Basic Sourdough Bread Recipe
There’s something freeing about a recipe that uses simple ingredients yet produces an artisan loaf: flour, water, salt, and an active sourdough starter. No commercial yeast, no extra fluff — just the classic fresh sourdough starter and time.
This basic sourdough bread recipe teaches you the important building blocks: fermentation times, how to build gluten structure with stretch and folds, why dough temperature matters, and how cold proofing in the fridge can fit into a busy life.
This loaf is forgiving too which makes it easy for so many people: it tolerates slight differences in ambient temperature and rise times, and it’s an excellent way to use a vigorous starter and get comfortable with whole grain flour combos or different flours next time (bread flour, whole wheat flour, or a touch of freshly milled sourdough starter influence all work beautifully in other recipes when you’re ready to experiment). For now, keep it simple and follow the process below for consistently delicious bread.
This post may contain affiliate links, which means I may earn a small commission at no extra cost to you if you make a purchase through these links. I only recommend products I personally use and trust. Your support helps keep this blog running—thank you!
The Baker’s Timeline
I like a timeline that fits family life and makes room for a dough rest, a second rise, and a flexible bake day. I always feel like seeing it all mapped out helps me see where it fits into my day.
Here’s the rough rhythm I use:
• Feed your starter the night before mixing your dough. A vigorous starter in the morning is key to a good rise.
• 8:00 AM — Mix dough.
• 8:30 AM — Dough rest (mixture rest).
• 9:00 AM — Begin stretch and folds. Repeat several sets.
• 11:00 AM — Bulk ferment at room temperature (keep an eye on the dough rise; you’re aiming for roughly a 50% increase in volume).
• 7:00 PM — Shape and refrigerate overnight (cold proof).
• The next day — Bake when your schedule allows (the dough can keep in the fridge for up to 48 hours).
That schedule is flexible — bulk fermentation and final proof times will vary with ambient temperature and the strength of your starter. Higher temperatures will speed fermentation; lower temperatures slow it. If your dough seems particularly sticky one day, try a slightly cooler dough temperature next time or adjust your stretch and fold cadence. These tweaks are how you learn the fermentation process and get the best results for your kitchen.
Key Ingredients
You can find the full list of measurements in the printable recipe card at the bottom of this post, but here’s a quick look at what makes this loaf come together beautifully:
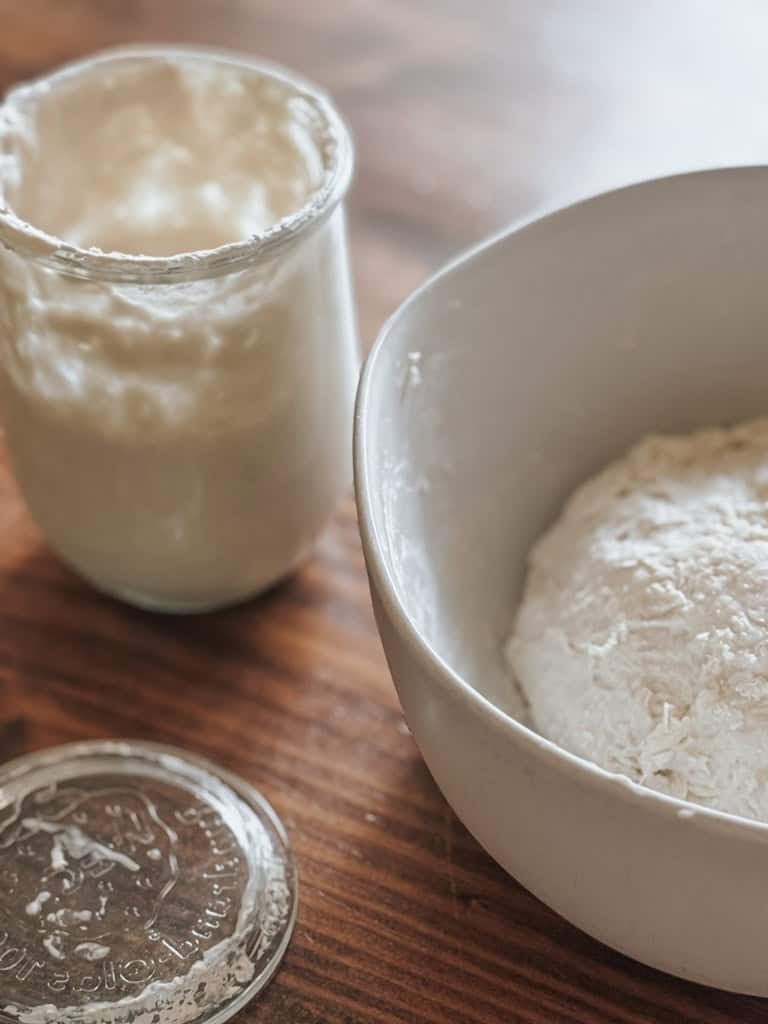
Active Sourdough Starter – Your yeast! This is the heart of sourdough baking and what gives your bread its rise, flavor, and character. Make sure it’s bubbly, active, and fed within the last few hours before mixing — a vigorous starter is key for a good dough rise.
Warm Water – The water temperature affects how quickly your dough ferments. Aim for comfortably warm (not hot) water — it helps activate your starter and encourages balanced fermentation.
All-Purpose Flour – The base of this loaf, all-purpose flour keeps the crumb soft and tender. You can experiment later with bread flour or whole wheat flour, but for this basic sourdough bread recipe, simple all-purpose flour gives the best results.
You can find a full list of ingredients in the recipe card located at the bottom of this post.
Key Ideas Before You Begin
- Use a vigorous, active starter. Feed it the night before so it’s bubbly and active the following morning. A vigorous starter gives you the best head start for a confident rise.
- Keep water temperature comfortable — not too hot. Water temperature affects dough temperature and fermentation speed. If you’re aiming for best results, measure if you like but use common sense: warm to the touch, not hot.
- This is a single loaf recipe, perfect for a standard dutch oven or combo cooker. If you have an iron dutch oven or a heavy hot pan, that’s great — they retain heat and create a lovely crust.
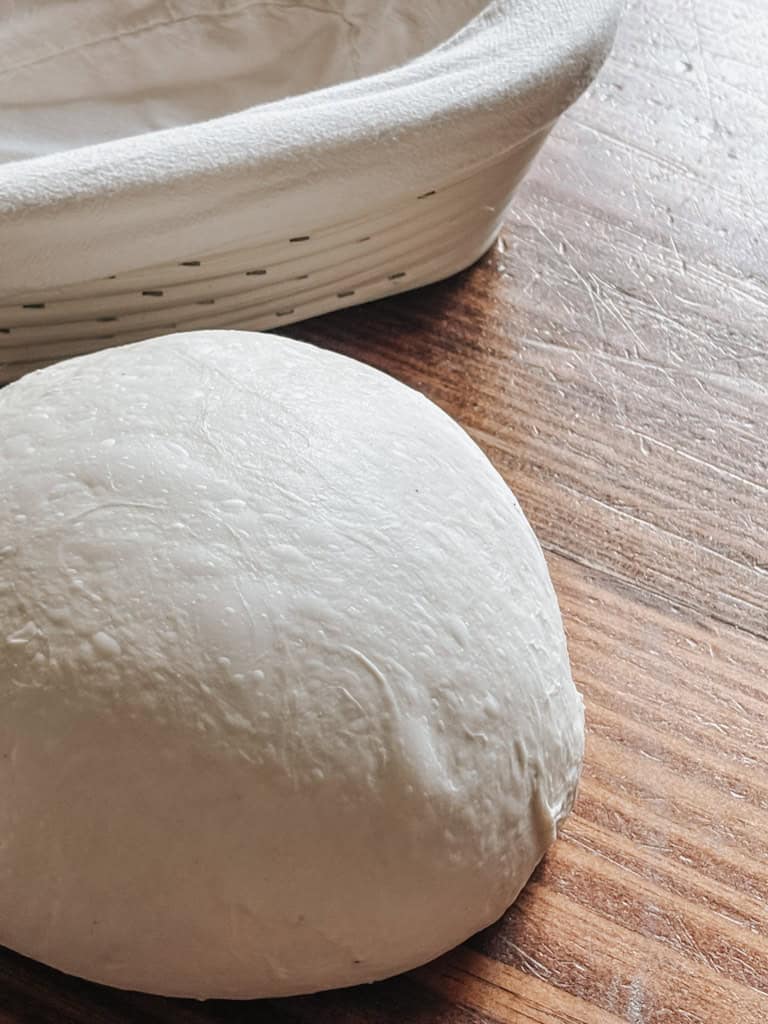
- Use a proofing basket for a nice shaped loaf. If you don’t have a proofing basket, a bowl lined with a floured towel works fine. A rubber band around the bowl? Not necessary — but a tidy seam and surface tension will help the loaf keep shape.
- The dough can be left in the fridge up to 48 hours. This slow fermentation (cold proof) deepens flavor and gives flexibility to your schedule.

How to Make a Single Loaf of Sourdough
Feed your starter the night before—Feed your starter the night before you plan to bake so it’s active and bubbly in the morning. This gives wild yeast time to become vigorous and ready to leaven your dough. If you’re using a classic fresh sourdough starter, make sure it’s had a good rise after feeding — you’re looking for a starter that’s doubled and full of bubbles the morning you mix.
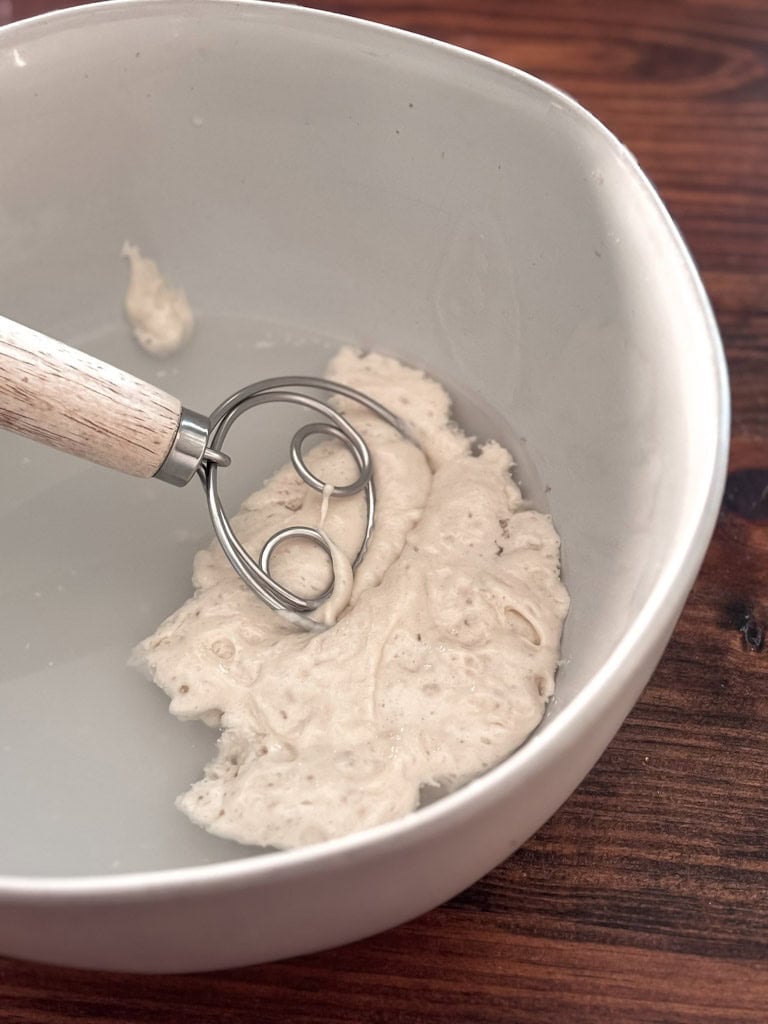
Mix the dough (8:00 AM)—In a large bowl, combine your warm water and active starter. Use a dough whisk or wooden spoon to disperse the starter into the water; you’ll see the mixture become cloudy and slightly elastic as the starter dissolves. Add the flour and salt, and mix until just combined — the dough will be shaggy, a little sticky, but coming together.
Take a moment here: using a dough scraper or a wooden spoon helps if your dough is particularly sticky. Don’t worry about perfection; early on the dough will be uneven but that’s normal. Cover the bowl with a piece of plastic wrap or a damp towel and let it rest for 30 minutes. This is the initial dough rest that helps flour hydrate and begins gluten development without effort.
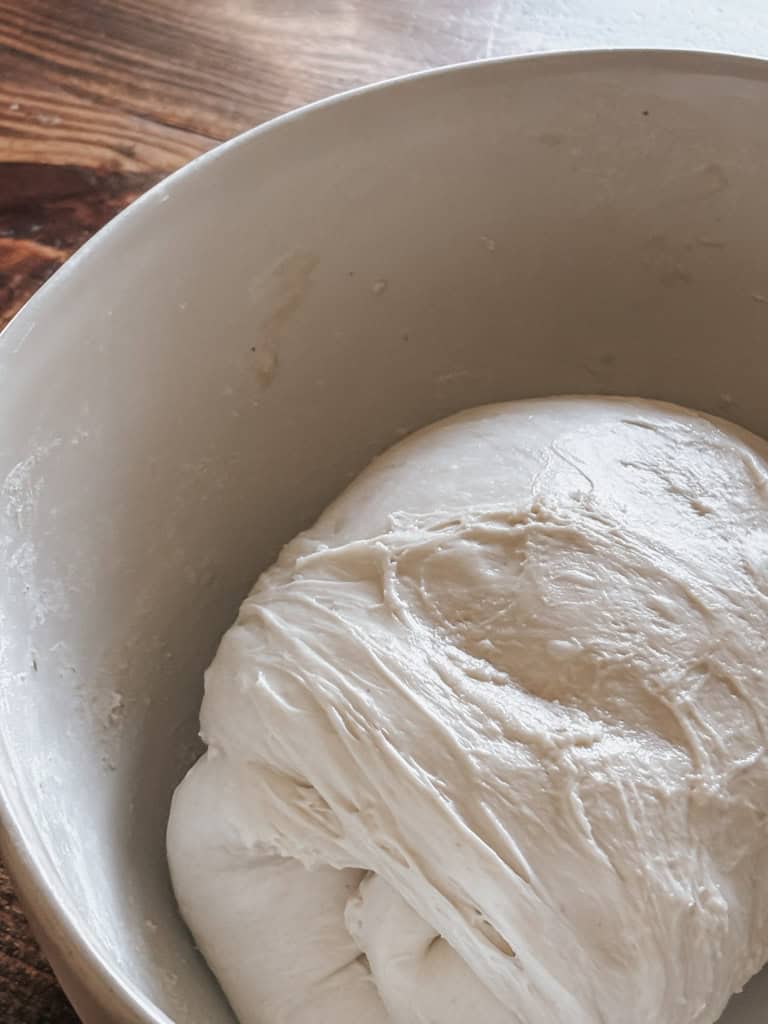
Stretch and folds (begin at 9:00 AM)—After the 30-minute rest, it’s time for the first set of stretch and folds (see video in post). Wet your hands slightly (this helps with sticky dough), reach under the dough, stretch it up, and fold it over toward the center. Rotate the bowl and repeat until you’ve folded all sides — usually 4 lifts/folds per set. Cover and rest for another 30 minutes.
Repeat the stretch and fold every 30 minutes for a total of 3–4 sets. This builds gluten structure slowly and gently, strengthening the dough for the bulk ferment without the need for intense kneading. If your dough feels sticky, that’s okay — sticky dough is common with higher hydration breads; the stretch and folds will help it become less slack and more structured. Watch the dough temperature and the rise — if your dough is getting warm or expanding quickly, you may slow the sets down next time or use slightly cooler water.
(Video note: If you prefer visual guidance, check my stretch and fold video— it’s a great companion for your first few bakes.)
Bulk fermentation (around 11:00 AM onward)—After the final set of stretch and folds, keep the bowl covered and let the dough bulk ferment at room temperature until it increases by about 50% in volume. This can take several hours and will depend on the ambient temperature. In a warmer kitchen the fermentation will be faster; in a cooler space it can take longer. For this recipe, aim for a slow, steady fermentation that develops flavor without collapsing the dough.
Shape the loaf (7:00 PM or when ready)—Once your dough has bulk fermented and shows good structure, gently turn it out onto a lightly floured work surface. With gentle hands — be careful not to deflate the whole thing — fold the dough into a round, creating surface tension by cupping your hands and pulling the dough toward you. This surface tension will help the shaped loaf hold up in the oven.
Let the dough rest for about 15 minutes after shaping. This short rest relaxes the gluten so you can do a final shaping that creates a smooth top (the smooth side) and a nice seam underneath. Place the shaped loaf seam side up into a floured proofing basket. If you don’t have a proofing basket, use a bowl lined with a well-floured towel. Cover with plastic wrap or a damp cloth.
Cold proof / Refrigerate (overnight or up to 48 hours)—Refrigerate the covered dough overnight for a cold proof. Cold temperature slows fermentation and deepens flavor — this is when the slow fermentation does its best work. The dough can keep in the fridge for up to 48 hours, which makes this recipe especially good for busy families: bake the next day when time allows without losing the dough’s quality.
Would you like to save this?
If you plan to bake the next morning, take the loaf directly from the fridge to the oven when ready. The dough benefits from the chill; I have learned that it’s easier to score cleanly and often holds its shape better when coming straight from cold to hot.
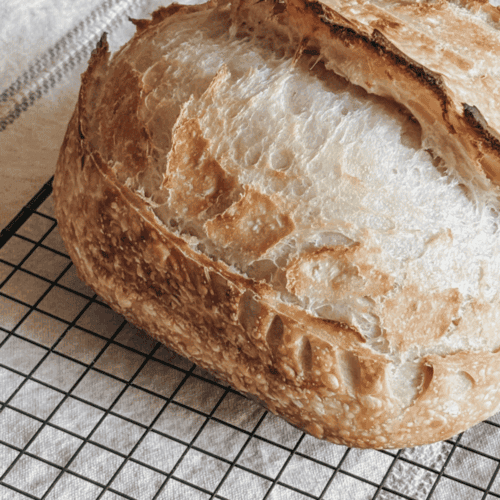
Preheat your Dutch oven and bake (the next day)—About 45 minutes before you plan to bake, place your dutch oven (or combo cooker) with the lid inside the oven and preheat to 500°F. A hot dutch oven creates steam and a high initial temperature that helps you get great oven spring and a crisp crust. If using an iron dutch oven or an iron combo cooker, they retain heat beautifully — making for a reliably excellent crust.
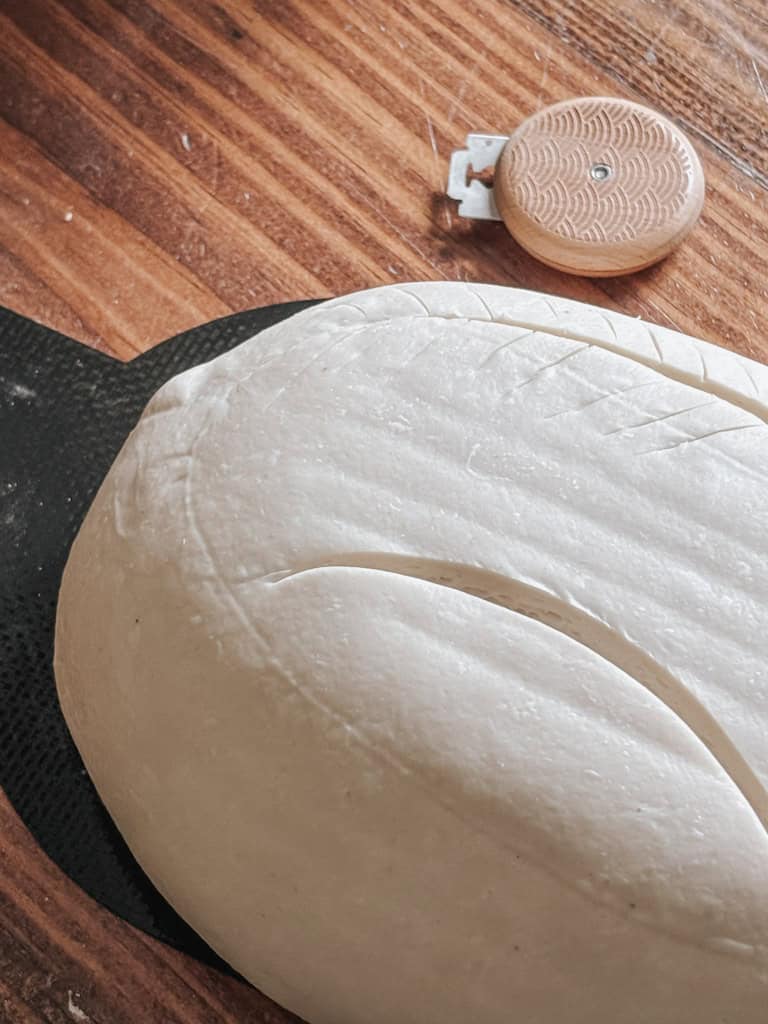
When you’re ready to bake, remove the proofing basket and place a piece of parchment paper over it. Invert the basket to release the dough onto the parchment. Score the top of the dough with a razor blade, a razor, or a bread lame — this is where you can be creative: a single long slash, a cross, or several shorter cuts. Scoring directs where the dough will open up and can dramatically affect the final shape of the loaf.
Use the parchment paper as a sling and carefully lower the dough into the hot dutch oven. Place the lid on, reduce the oven temperature to 450°F, and bake for 30 minutes. After 30 minutes, remove the lid and continue to bake for another 10–15 minutes until the crust is deeply golden and the loaf sounds hollow when tapped on the bottom.
Cool completely on a wire rack before slicing — resist the temptation! The crumb finishes setting as it cools and slicing too soon can make the crumb gummy.
Troubleshooting & Sourdough Tips
Sourdough is wonderfully forgiving, but here are a few practical tips to help you troubleshoot and improve with each bake:
- Sticky dough: Use a dough scraper and wet hands for handling. A sticky dough often has higher hydration, which gives an open crumb but can be noisy to handle. With practice, sticky dough becomes less intimidating.
- Dough not rising enough during bulk fermentation: Check your starter — an underfed starter won’t give a good rise. Also consider room temperature: lower temperatures slow fermentation. For a head start next time, use slightly warmer water or ensure your starter is vigorous before mixing.
- Dough overproofed: If the dough has flattened or looks slack after bulk fermentation, it may have overproofed. Shorten the bulk ferment next time or move to a cooler spot—higher temperatures will speed fermentation.
- Surface tension: If your shaped loaf collapses, focus on creating surface tension during shaping. Pulling the dough toward you and rotating it as you shape helps build a smooth outer skin that holds shape.
Recipe FAQs
Yes. This basic sourdough bread recipe is written for all-purpose flour, but different flours will change texture and flavor. Whole wheat flour and bread flour can be used in combinations in other recipes — whole grain flour adds great flavor and texture, while bread flour can give more chew and structure.
Up to 48 hours. The cold proof deepens flavor and gives you scheduling flexibility.
Feed it the night before at a ratio that encourages activity (for many that’s 1:1:1 or 1:2:2, depending on your starter and routine). If your ambient kitchen is cool, give it a slightly warmer spot to rise, or wait until it’s visibly active before mixing dough.
A hot dutch oven gives you the best oven spring and crust. If you have a heavy hot pan or an iron dutch oven, use that — heat retention is what matters. A combo cooker is a great alternative if you have one.
Sure — though this recipe is designed to be an artisan shaped loaf baked in a dutch oven for that crisp crust and open crumb. A loaf pan will yield a different shape and crust profile but will still make delicious bread.
Ingredients and Tools
This recipe champions simple ingredients: flour, water, salt, and starter. But tools and small choices make a difference in practice.
- Measuring cup vs. grams: This recipe uses cup measures in the recipe card at the bottom, but weighing ingredients in grams gives more consistent results. If you’re experimenting with different flours (g flour, g water, g starter), a scale will be your best friend.
- Dough scraper: A small dough scraper is essential for handling sticky dough and keeping your work surface tidy.
- Proofing basket: A proofing basket helps shape the loaf and give it that nice final proof surface. If you don’t have one, a bowl lined with a floured towel works.
- Razor blade / bread lame: Use a razor blade or bread lame to score the dough cleanly. Scoring lets the loaf open where you intend it to, producing that lovely ear and oven spring.
- Plastic wrap and piece of parchment paper: Use plastic wrap to cover your proofing basket or bowl for the cold proof; a piece of parchment paper helps move the dough into the hot dutch oven safely.
Flavor Building & Fermentation Notes
Slow fermentation is a flavor builder. Cold proofing overnight (or up to 48 hours) deepens the tang and complexity of your loaf, and it’s one of my favorite ways to marry sourdough into a busy family schedule. The longer and slower the fermentation, generally, the more nuanced the flavor — but watch for overproofing, which can flatten the loaf and reduce oven spring.
The fermentation process is both a science and an art: wild yeast and lactobacilli (the organisms in your homemade sourdough starter) work together to make the loaf rise and give that sourdough tang. Adjust temperature and timing based on your kitchen’s ambient temperature. If your kitchen is warm (higher temperatures), fermentation times will be faster; if cold, you’ll see slower dough rise and may need longer bulk fermentation.
Tried and True
Every loaf teaches something. On your second time, you’ll notice the way the dough feels under your hands during the dough rest and the effect of each stretch and fold on the dough’s surface tension. By the tenth bake, you’ll have a sense for how much time you need for bulk fermentation in your kitchen’s ambient temperature and what tweaks to make — maybe slightly cooler water in summer or a little more time for the dough rise in winter.
This basic sourdough bread recipe is a great practice loaf because it gives you reliable structure to learn these variations without changing the recipe itself.
Variations & Different Flours
When you’re ready, try experimenting with small percentages of other flours next time: a scoop of whole wheat flour or a touch of freshly milled sourdough starter flour can add flavor.
Remember that different flours absorb water differently; if you add significant whole grain flour, you may notice the dough’s hydration changes and might adjust your handling accordingly. Bread flour gives stronger gluten and a chewier crumb; rice flour is sometimes used in small amounts in other recipes for structure or dusting, but for this loaf keep it simple.
Serving & Storage
Once cooled, slice with a serrated bread knife. Store the loaf wrapped in a linen bread bag or loosely in a paper bag at room temperature for a day or two. For longer storage, slice and freeze — it toasts beautifully from frozen—I love this trick! It helps on days I need a quick bread to go with dinner. Reheat slices in a hot pan or toaster for that fresh-baked texture and flavor.
Final Encouragements
The first attempt at sourdough can feel like a miracle — and sometimes like a mystery. I remember early loaves that were either flat, too dense, or perfectly imperfect. I get it! With each bake you learn more about how your starter behaves, how ambient temperature alters fermentation, and how to read your dough.
If your first time doesn’t produce a perfect artisan loaf, that’s okay. The next day, that same dough might still be delicious — toast it, make breadcrumbs, or turn it into garlic croutons. There’s always a use.
Make this recipe your rhythm. Feed your starter the night before, follow the timeline, trust the dough rest and the stretch and folds, cold proof overnight, and remember the hot dutch oven is your friend. Over time you’ll notice small improvements: stronger oven spring, more predictable rise times, and a crumb you’ll be proud to slice for family breakfast.
Helpful Tools
- Link to my Sourdough Course and Free Starter Guide — for deeper lessons about starter feeding ratios, troubleshooting, and printable recipe cards.
- Watch my stretch and fold video (LINK) for a visual guide to the method.
- Printable recipe — if you’d like a printable recipe card to keep in your kitchen, I have one ready at the bottom on the post.
More Sourdough Recipes
- How to Stretch and Fold Sourdough Bread-Technique
- Simple Sourdough Breakfast Recipes using Sourdough
- Overnight Apple Cinnamon Sourdough Bread
Closing
There’s a profound joy in baking a loaf of sourdough that your family will reach for throughout the week. This single loaf basic sourdough bread recipe is exactly what I turn to when I want reliable, delicious bread with minimal fuss. It fits into a real life where schedules shift and dinner plans change. It teaches you core sourdough skills — dough rest and stretch and folds and shaping — while letting you build confidence in the fermentation process.
Want more delicious recipes sent straight to your inbox? Subscribe to my newsletter to receive the latest!
If you make this recipe, please leave a rating on the recipe card below! I’d also love for you to tag me @autumn.chasingoursimple on Instagram so I can see what you’ve been baking!
Single Loaf Basic Sourdough Bread Recipe
Ingredients
- ½ cup active starter
- 1½ cup warm water
- 4 cup all-purpose flour
- 2½ tsp salt
Instructions
Mix the Dough:
- In a large bowl, combine the water and active, bubbly starter and disperse using a dough whisk or a fork.
- Add the flour and salt. Mix to combine using a dough whisk and finishing by hand.
- Once you have a shaggy dough, cover and let it rest for 30 minutes
Stretch and Fold:
- After 30 minutes is up, perform a series of stretch and folds (see video in post).
- Cover, and let the dough rest for another 30 minutes. Repeat the stretch and fold method 3-4 more times leaving the dough to rest for 30 minutes in between.
Bulk Fermentation:
- Keep the bowl covered and let it rise at room temperature for 8 hours or until the dough has increased by 50% in volume.
Shape:
- Gently shape the dough into a round cupping your hands around the dough, pushing and pulling the dough to create tension. Let the dough rest for 15 minutes and then place it into a proofing basket seam side up and pinch the seam closed.
Proof:
- Cover the proofing bowl with plastic wrap and refrigerate overnight or up to 48 hours.
Bake:
- Place a dutch oven inside your oven and preheat to 500°F.
Score:
- Cut a piece of parchment paper and place it over the proofing bowl. Invert the bowl to release the dough.
- Use the tip of a sharp knife or a bread lame to score the dough however you like. Use the parchment paper as a sling and place it inside the Dutch oven.
Bake:
- Place the lid on the dutch oven and drop the temperature to 450°F.
- Bake the dough for 30 minutes. Remove the lid and continue to bake for another 10-15 minutes.
- Cool on a wire rack completely before slicing.


I’m an experienced sourdough baker who’s recipe makes two loaves.. I’m older and it had become more of a chore than a joy, to handle that much dough every time I baked. This recipe however, changed everything! It’s so simple that I don’t even need my scale! Thank you so much, this is a winner for me and of course, the bread is perfect and delicious every single time…
Lynnie this made my day! I’m so glad you found it easy.