Fresh Milled Sourdough Bread
Last Updated on February 6, 2026 by Autumn Ballard
Learn how to make sourdough bread with fresh milled flour for the best flavor, nutrition, and texture. This beginner-friendly recipe walks you through milling, mixing, shaping, and baking a wholesome artisan loaf.
There’s something almost sacred about turning whole wheat berries into a warm, crusty loaf of sourdough bread. It feels like slowing down, leaning in, and choosing something better — better flavor, better nutrition, and better rhythm in your kitchen.
There’s a depth of flavor and a kind of honest nourishment that fresh milled flour brings to bread dough that you simply cannot get from store-bought flour.
And the very best part? You don’t need to be an expert baker or one of the sourdough experts on the internet to make it happen. You just need simple ingredients, a little time, and a process that feels doable for real-life home bakers.

So today, I’m walking you through this fresh milled sourdough recipe from beginning to end — from milling your own flour to shaping your ball shape of dough to pulling a golden brown, crusty loaf of bread from your dutch oven. This is the exact sourdough loaf I make for my daily bread. It’s the one I lean on when life is full, kids are loud, and the kitchen counter is covered with a little fresh flour and someone’s math workbook.
This is fresh milled sourdough as simple, approachable, and rewarding as it should be.
Why Bake Sourdough with Fresh Milled Flour?
If you’re here, you probably already feel the tug toward whole grains, home milling, and sourdough recipes that use your own flour instead of commercial flours. Maybe you’ve been curious about the health benefits.
Maybe you love the idea of choosing your own wheat berries and getting flavor that white flour or purpose flour just can’t give you. Or maybe you’re just tired of trying to make a good recipe work with flour that’s been sitting on a shelf for months.

Freshly milled flour has this unique flavor — warm, earthy, deep — full of natural oils and nutrients that start to fade the moment flour is ground. When you mill your own wheat berries, those nutrients are still alive. Your dough behaves differently.
Your crumb has more character. And your bread carries a richness that feels like it came straight out of an old-world bakery. I have throughly enjoyed this fresh milled flour process and bringing it around to the traditional sourdough loaf is perfection.
You’ll find:
- better oven spring
- more consistent results
- a loaf that stays fresh longer
- and a taste that blows conventional flour or even organic store-bought flour out of the water
If you’re brand new to milling, I have a full Quick Start Guide that walks you through:
- choosing the right grains
- how to store berries
- basic mill troubleshooting
It’ll help you get set up with confidence before your first rise or second rise ever begins.
The Best Grains for Artisan Sourdough
Choosing your whole grains is part of the fun — and part of the flavor. I use a 50/50 mix of hard red wheat and hard white wheat for this recipe because it gives the perfect balance of strength, structure, and that classic whole wheat sourdough bread flavor.

Here are my favorites:
- Hard White Wheat – mild, slightly sweet, perfect for beginners and consistent results
- Hard Red Wheat – deeper, heartier, more traditional whole wheat flavor
- Einkorn – delicious, but lower gluten, so best for more experienced bakers
- Spelt or Khorasan – naturally extensible, nutty, and beautiful when blended with hard wheat
You truly can’t go wrong — each grain brings its own personality. But this whole wheat flour blend has become my go-to for a reason.
Milling Your Wheat Berries
Milling is almost meditative. It’s this quiet moment where the simple process begins — just you, your home mill, and the grain itself.

I primarily use a NutriMill grain mill because it makes quick work of grinding the wheat berries into fresh milled flour that’s soft, fine, and perfect for artisan bread. If you’re using a different mill, just follow its settings for bread flour fineness. There’s no wrong way — only what works in your kitchen.
And yes, before you ask — milling at home does not need an expensive machine. Some people use hand mills, some use older electric mills, and some upgrade over time. Do what works for you.
Once your flour is milled, let it cool slightly so you’re not mixing warm flour with your active sourdough starter. Warm flour can raise the hydration level of your dough and make things feel sticky — especially if it’s your first time working with freshly milled flour.
What You’ll Love About This Recipe
There’s something deeply comforting about taking simple ingredients — water, salt, flour, sourdough starter — and watching them transform during dough rest, series of folds, and bulk fermentation into something so beautiful.
This recipe is:
- approachable for beginners
- perfect for daily bread
- built around whole grains
- flexible with timing
- beautiful for your sourdough journey
- reliable enough to use every single week
And most importantly — it uses fresh milled flour without complication or fuss.
This post may contain affiliate links, which means I may earn a small commission at no extra cost to you if you make a purchase through these links. I only recommend products I personally use and trust. Your support helps keep this blog running—thank you!
Key Ingredients
You’ll find all the details in the recipe card, but here’s a quick overview so you know what to expect as you bake:
- Fresh milled flour – a mix of hard red wheat and hard white wheat
- Water – room temperature for best results
- Active sourdough starter – bubbly, happy, and ready
- Salt – essential for flavor and dough structure
Just simple ingredients doing beautiful work together.
You can find a full list of ingredients in the recipe card located at the bottom of this post.
How to Make Sourdough Bread with Fresh Milled Flour
This is where the magic begins.
Mill Your Flour—Start by grinding your wheat berry blend into flour. You’ll mill enough to measure the full amount needed in the recipe. Freshly milled flour brings the depth of flavor that makes this loaf shine.
Would you like to save this?
Let your flour cool slightly on the kitchen counter while you gather everything else.
Mix the Dough—Grab a large mixing bowl or the bowl of your stand mixer. Add the water and your active sourdough starter. Stir with a danish dough whisk or spoon until the starter is dissolved. Add your fresh milled flour and salt. Combine until all dry flour disappears — it won’t look pretty yet, and that’s okay.
Cover bowl with plastic wrap or a damp towel and let the dough hydrate for 45 minutes. This dough rest helps whole grain flour fully absorb the water.
Stretch and Fold—This is always my favorite part — the moment the dough starts to shift from shaggy to silky.
You’ll do a series of folds (also called sets of stretch in some recipes) to develop the gluten gently:

- Grab one side of the dough
- Stretch it up
- Fold it over itself
- Give the bowl a quarter turn
- Repeat
Do this 4–6 times, waiting about 30 minutes between rounds. You’ll feel the dough transform under your hands — smoother, bouncier, stronger. Whole wheat sourdough bread especially loves these gentle folds.
Bulk Fermentation—After your last stretch, cover the dough again and let it rise at room temperature for 2–3 hours. This is your bulk fermentation stage — the dough will become fuller, slightly domed, and a bit jiggly when tapped. You’re looking for lightness and life. Fresh flour sometimes ferments slightly faster, so keep an eye on it. A robust starter helps too.

Shape the Dough—Lightly dust your counter with rice flour or whole grain flour and gently turn your dough out. Let it take a short bench rest if it feels extra elastic — just 10 minutes. Shape into a ball shape by pulling the dough toward you to create tension. Prepare your banneton basket (or loaf pan or bowl lined with a tea towel). Place the dough seam-side up in the basket and pinch the seam closed.
Cold Ferment—Cover the dough (plastic bag, plastic wrap, damp towel — truly whatever works) and place it in the fridge anywhere from overnight to the next morning… or even up to 2–3 days. This rest adds flavor, strengthens the dough, and makes scoring so much easier.

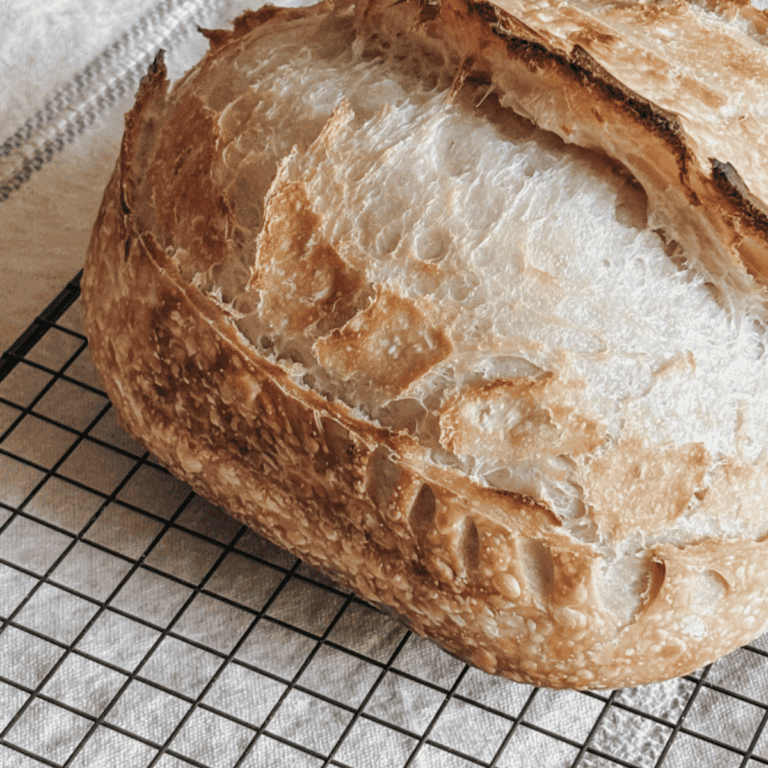
Bake the Bread—Place your dutch oven into your oven and preheat to 500 degrees f. Once hot, reduce heat to 450. Turn your dough out onto parchment paper, seam-side down. Use a sharp knife or razor blade to score the top about ½ inch deep. Good scoring helps achieve better oven spring.
Carefully lift the dough into the dutch oven, cover with the lid, and bake 20 minutes. Remove the lid and bake another 15–20 minutes until golden brown. My house always smells like a dreams-come-true bakery when I am done! My family loves it!

Cool + Serve—Move the loaf to a wire rack. Let it cool completely before slicing — the internal temperature stabilizes, and the crumb won’t become gummy.
Take a moment here. This is a whole loaf you made from whole grains — from berry to bread. It never gets old.
How to Shape, Score, and Bake (Quick Overview)
Shaping
- Turn dough onto a lightly floured surface after bulk fermentation.
- Let it rest 10 minutes if it feels tight (bench rest).
- Use hands or a bench scraper to pull the dough toward you, creating surface tension.
- Shape into a smooth ball with a sealed bottom seam.
- Place seam-side up in a floured banneton or towel-lined bowl.
Scoring
- Turn cold dough out onto parchment paper, seam-side down.
- Use a razor blade or sharp knife to make one confident ½-inch-deep slash.
- Keep the score simple — it guides the oven spring and prevents blowouts.
Baking
- Preheat a dutch oven inside your oven for maximum steam.
- Lower heat slightly once preheated.
- Lift parchment and dough into the hot dutch oven, cover with lid.
- Bake covered to allow rise, then uncover to finish until golden brown.
- Transfer loaf to a wire rack and cool completely before slicing.
Storage + Slicing Tips
Once your loaf has cooled completely:

- Keep in a linen bag or bread bag
- Wrap in a tea towel for countertop storage
- Freeze slices in a plastic bag for quick toast
- Use a sharp knife for clean slices
This bread stays tender and flavorful thanks to the fresh milled flour.
Troubleshooting Fresh Milled Sourdough
Here are the most common issues home bakers run into:
- Dense loaf?—Probably underproofed during bulk fermentation.
- Sticky dough?—Hydration level too high or flour too freshly milled.
- Weak gluten?—Grain choice or not enough folding.
- Pale crust?—Oven not hot enough or not enough steam.
Every loaf teaches you something. Even the “off” ones which is what I love about sourdough! The process is much like life, always learning and teaching through the process.
Recipe FAQs
You can, but you’ll lose the unique flavor and health benefits of fresh milled flour.
Yes — but baking in a dutch oven yields the best oven spring.
Fresh flour, hydration, and room temperature all affect fermentation.
Absolutely. You should!
More Fresh Milled Flour Recipes You’ll Love
Bringing It All Together
There’s just nothing like pulling a warm, golden loaf of fresh milled sourdough from your oven — knowing you milled the flour, shaped the dough, and brought it to life with your own hands. It’s slow, simple, deeply satisfying work that fits beautifully into real family rhythms. I hope this guide gives you the confidence to dive in, trust the process, and enjoy every step of your sourdough journey.

Want more delicious recipes sent straight to your inbox? Subscribe to my newsletter to receive the latest!
If you make this recipe, please leave a rating on the recipe card below! I’d also love for you to tag me @autumn.chasingoursimple on Instagram so I can see what you’ve been baking!

Fresh Milled Sourdough Bread
Ingredients
- 1½ cup water
- ½ cup sourdough starter
- 5 cups fresh milled flour (50/50 mix hard red and hard white)
- 2 tsp salt
Instructions
- Start by milling your wheat berries to make freshflour. You’ll need enough to measure the required amount once ground.
- In the bowl of a stand mixer or large mixing bowl, combine the water and active sourdough starter. Stir well until the starter is dissolved.
- Add the freshly milled flour and salt, then mix until a rough dough forms—no dry flour should remain. Cover the bowl and let the dough rest for 45 minutes to hydrate.
- After resting, begin a series of stretch and folds to develop gluten strength
- Grab one side of the dough, stretch it upward, and fold it over itself. Rotate the bowl a quarter turn and repeat until you’ve gone all the way around.
- Perform this process every 30 minutes for a total of 4–6 rounds. You’ll notice the dough becoming smoother and stronger after each fold.
Bulk Fermentation
- Once the final fold is complete, cover the bowl and let the dough rise at room temperature for 2–3 more hours, or until it looks domed and airy.
- The dough should feel light and slightly jiggly when gently poked.
Shape the Dough
- Gently turn the dough out onto a lightly floured surface.
- Prepare a banneton basket or bowl lined with a floured linen or tea towel.
- Flip the dough seam-side down, then gently pull it toward youto create surface tension and seal the bottom seam. Place the shapeddough into the prepared basket, seam-side up, and pinch to close.
- Cover the dough and refrigerate overnight, or for up to2–3 days. This long rest develops flavor and makes the dough easier tohandle.
Baking the Bread
- When ready to bake, preheat your oven to 500°F with a Dutch oven (and lid) inside.
- Once preheated, carefully remove the Dutchoven and lower the temperature to 450°F .
- Turn the cold dough out onto apiece of parchment paper, seam-side down. Score the top about ½ inch deep using a sharp blade or knife.
- Carefully place the dough and parchment into the preheated pot, cover with the lid, and bake for 20 minutes.
- Remove the lid and continue baking for 15–20 minutes, or until the crust is deeply golden brown.
Cool and Serve
- Transfer the loaf to a cooling rack and allow it to cool completely before slicing. This ensures the crumb sets properly and prevents gumminess.