How To Make Bagels with Fresh Milled Flour
Learn how to make soft, chewy bagels with fresh milled flour. This simple from-scratch recipe uses freshly ground wheat for hearty flavor, perfect texture, and a wholesome homemade bagel you can feel good about serving your family.

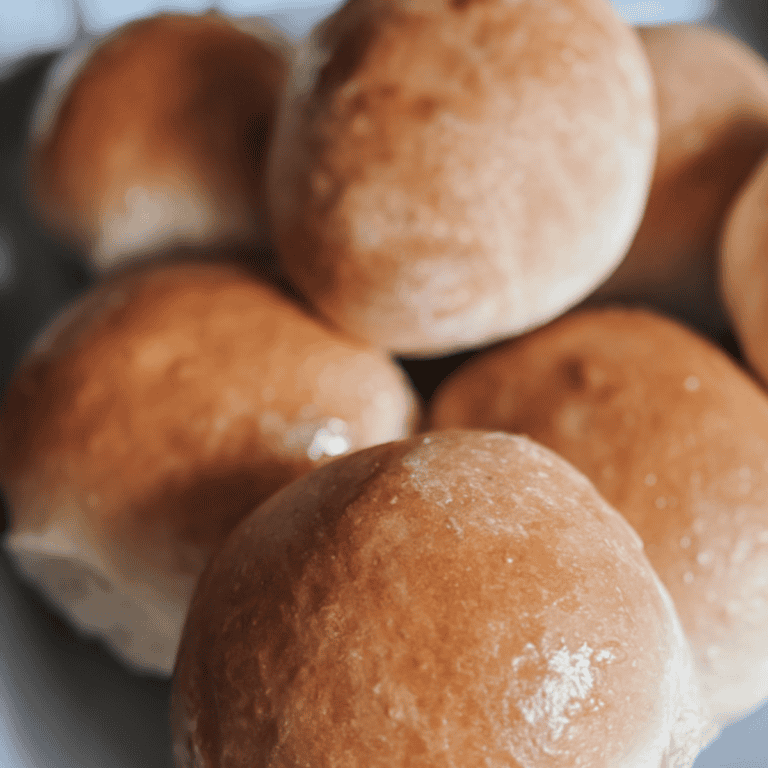
These homemade bagels are soft, chewy, and perfectly golden — made with fresh milled flour for rich flavor, whole grains, and extra nourishment. They’re the perfect weekend bake to enjoy warm from the oven, or freeze for easy breakfasts all week long. And truly, once you make your own bagels at home, you’ll wonder why you ever settled for store-bought flour versions before.
Why Make Bagels with Fresh Milled Flour?
If you’ve been around here for any amount of time, you already know how much I love baking with fresh milled flour. It’s one of the best things I ever brought into my kitchen—truly a simple upgrade that brings huge flavor, texture, and health benefits.

Using a grain mill gives you access to the full wheat berry, not just the parts that survive the shelf-stabilizing process of common purpose flour or white flour. Fresh flour retains its natural oils, depth, and nutrients, and because it hasn’t been sitting packaged for months, it gives you better rise, softer dough, and heartier flavor.
For bagels especially—where structure and chew matter—freshly milled hard white wheat delivers the perfect balance: strong enough for that classic chewy crust yet soft enough to keep the inside tender.
If you’re new to milling, I have a complete beginner guide that walks you through equipment, wheat berries, and the process of getting started.
This post may contain affiliate links, which means I may earn a small commission at no extra cost to you if you make a purchase through these links. I only recommend products I personally use and trust. Your support helps keep this blog running—thank you!
Ingredients You’ll Need
For these delicious bagels, you’ll be using simple ingredients—just the way from-scratch baking should be. The main ingredients include:

- Hard white wheat (freshly milled into flour)
- Warm water
- Honey
- Instant yeast
- Salt
- A touch of sugar + baking soda for the water bath
You can find a full list of ingredients in the recipe card located at the bottom of this post.
How to Make Fresh Milled Bagels
Bagels often feel intimidating because of the extra steps—but I promise you, once you try them, you’ll see how doable and fun they are. This process fits beautifully into a slow weekend rhythm, and the results are more than worth it. Below is an overview of the steps so you know exactly what to expect as you work through the process.
Mix the Dough—You’ll start by combining your warm water, honey, and salt in the bowl of a stand mixer. This mixture—often called honey water—helps kickstart the dough and gives your bagels their subtle sweetness and signature chew. Add half of your fresh milled flour along with all of the instant yeast and mix well.
Once everything is hydrated, go ahead and add the remaining flour. Using the dough hook attachment, knead the bagel dough on low speed and then medium speed until a stiff dough forms. Bagel dough is intentionally tighter than regular bread dough, and you should feel it pulling together cleanly.
Fresh milled flour absorbs water differently than store-bought flour, but with hard white wheat and this method, you’ll achieve the perfect stiff dough without needing add-ins like vital wheat gluten or extra white flour.

Let It Rise—Transfer your ball of dough into a large mixing bowl or large bowl. Cover it with plastic wrap or a tea towel and let it rest until doubled. Rise times can vary based on room temperature, but fresh milled dough generally rises beautifully.
If you ever want to prep ahead for busy mornings, you can also shape the bagels and place them in the fridge for an overnight rise, then boil and bake them the next morning.

Divide and Shape—Once your dough is ready, use a bench scraper to divide it into 12 equal pieces. You can use a kitchen scale if you want perfectly even grams of dough or larger bagels—but I usually just eyeball it for rustic charm.
Would you like to save this?
Roll each of your dough pieces into a tight dough ball using the tuck method. This step helps with structure and gives you a smoother surface for that perfect bagel shape.

After they rest for a few minutes, poke your thumb through the center of each dough ball and twirl it gently to create the center hole. This is where you’ll feel the transformation from bread dough to actual bagels.
Prepare the Water Bath—Preheat your oven to 425°F and line your favorite baking sheet with parchment paper (or your standard sheet pan if that’s what you have). Meanwhile, fill a large pot of water and bring it to a boil.
Add the sugar and baking soda to create your boiling water bath—this is what helps give bagels their classic chewy crust and slightly golden brown exterior.
Boil Bagels—Working in small batches (3–4 at a time so they don’t overcrowd), gently place your shaped bagels into the boiling water. They’ll need about 1 minute per side. If you’re ever unsure, you can do the float test—if a shaped bagel floats within a few seconds, it’s ready for the boil.

Use a slotted spoon to remove each one, letting the excess water drip off before placing them onto your prepared baking sheet.

Bake Until Golden—Bake the bagels for about 30 minutes, flipping halfway through. They’ll come out beautifully golden brown and perfectly chewy. Transfer them to a cooling rack to finish setting.
Once cooled slightly, slice and spread with cream cheese, butter, or even a little Greek yogurt mixed with honey. Truly the perfect bagel every single time.
Flavor & Topping Variations
Bagels are one of those recipes I never get tired of experimenting with. Here are some simple ideas:
- Everything bagel seasoning for full savory flavor
- Sesame seeds for a nutty crunch
- Cinnamon sugar added after baking
- Olive oil + herbs brushed on warm bagels
- Poppy seeds, onion flakes, or mixed seeds
Recipe FAQs
Yes, but the flavor will be slightly different. Fresh milled flour gives you the best results in both texture and rise because it hasn’t lost nutrients the way store-bought flour often has.
Absolutely. Freeze them after baking for easy longer storage and reheat in the oven or toaster the next day or even the next morning.
Yes—just divide your dough into 8 instead of 12. Adjust boil and bake times slightly.
No. Fresh milled hard white wheat gives structure like bread flour while still offering the health benefits of ancient grains and whole grains.
Not this version, but you can use this exact process with your own sourdough starter if you prefer naturally fermented bakes.
More Fresh Milled Baking Inspiration
If you love baking with whole grains, here are more recipes to try next:
- Easy Fresh Milled Pancakes
- Fresh Milled Cinnamon Rolls
- Simple Fresh Milled Chewy Chocolate Chip Cookies

Fresh milled flour truly transforms the simplest recipes, and once you get comfortable milling your own wheat berries, the possibilities open wide—everything from bagels to brownies to sandwich bread.
Want more simple, from-scratch recipes delivered straight to your inbox? Subscribe to my newsletter so you never miss the latest bake or kitchen tip!
If you make this recipe, I’d love to see it — tag me @autumn.chasingoursimple on Instagram and share your creation! Don’t forget to leave a star rating on the recipe card below so others can find and enjoy it too.

How To Make Bagels with Fresh Milled Flour
Ingredients
- 2 cups warm water
- ¼ cup honey
- 3 tsp salt
- 6 cups freshly milled flour (hard white)
- 2 tsp instant yeast
- 1 tbsp sugar + 1 tablespoon of baking soda for boiling water
Instructions
- In the bowl of a stand mixer, combine water, honey, and salt. Add half of the flour and all of the yeast and mix well.
- Next, add the remaining flour and knead the dough using the dough hook attachment for about 8 minutes. A slightly stiff dough will form.
- Cover and allow the dough to rise until doubled.
- Once the dough is ready, divide it into 12 pieces and shape each piece into a ball and allow them to rest.
- Preheat the oven to 425°F and line a baking sheet with parchment paper.
- Prepare to boil the bagels by filling a large pot with water and bring it to a boil. Add sugar and baking soda to the boiling water.
- Take each ball and poke a hole in the middle using your thumb. Twirl the dough on your thumb to enlarge the hole allowing them to rest for about 5 minutes before placing them in the boiling water. Cook 3-4 bagels at a time so that the pot doesn't get overcrowded.
- Boil the bagels for 1 minute on each side and remove them with a slotted spoon and place them on a parchment lined baking sheet.
- Bake for about 30 minutes turning them over at the halfway point.