Classic King Arthur Sourdough Bread Recipe
Last Updated on September 26, 2025 by Autumn Ballard
Bake a loaf using this classic King Arthur sourdough bread recipe and get a beautiful and delicious loaf time after time.
This tutorial is for the beginning sourdough baker and will guide you step by step through the process of baking your first loaf and many, many more.
This recipe was updated in September of 2025.

Have you been wanting to learn sourdough but honestly just feel overwhelmed by all of the terminology and steps in the process? Often times we can overcomplicate things by believing we need to have a full understanding to get started. BUT yall, It’s just bread! Honestly, the rhythms and process of sourdough are just as enjoyable as the first bite.
So, take a deep breath and just get started.
In this tutorial, you will learn how to bake a classic sourdough loaf using your own sourdough starter. We will go over terminology but I encourage you not to get tripped up on the language of sourdough. I’ll explain everything in layman’s terms as we go.
Let’s dive into the basics of sourdough baking and I promise if you’ll just stick with it, you’ll be baking delicious breads and other homemade sourdough recipes in no time!
This post contains affiliate links, which means I make a small commission at no extra cost to you.
My Journey with Sourdough
My journey is probably much like yours. Scrolling through the ‘gram I would see loaves of bread and the word sourdough everywhere. Honestly, I’ve never had a taste for sourdough, at least that’s what I thought. Before I began baking, I had only had store-bought bread and maybe a sandwich here and there on sourdough. It wasn’t something I even thought to make myself.
2020 happened and I began to reevaluate our lifestyle and felt a pull to slow down and embrace life’s simple pleasures a little more. We bought some chickens, planted a garden, and sourdough just seemed like the proper next step. Ha! Up until that point, I had never baked a loaf of bread and had no idea that bread could be made without store-bought yeast.
My first sourdough starter was a failure. I used cheap flour and after weeks of following the steps I threw it away. Feeling determined, I googled my issue and found King Arthur flour as the most recommended flour for sourdough baking. I started over and this time it worked!
What is Sourdough?
Sourdough is a naturally leavened bread which just means there’s no commercial yeast added to make the bread rise. (I told you we’re keeping it simple.) Instead, it’s fermented using a sourdough starter. It’s richer in nutrients and lower in gluten therefore making it easier to digest than breads made with traditional yeast.

Sourdough Starter
Before you begin making bread, you’ll need what is called a starter. I’ve created a free download with easy-to-read, day-by-day steps to creating a homemade sourdough starter.
A sourdough starter is made by mixing just two ingredients…equal parts flour and water! Yes, it’s that simple. I have step-by-step instructions for making your own sourdough starter here. Once you begin mixing flour and water in a jar, wild yeast and bacteria from the environment of your home will begin feeding off the flour causing it to multiply. Crazy huh?
By feeding (sourdough jargon meaning adding flour and water to your starter) the starter regularly, it will gain strength and can eventually be used to make simple sourdough bread. This process of building your starter typically takes 1-2 weeks.
Feeding Your Starter for This Sourdough Recipe
For this recipe, you’ll need an active fed starter. I recommend feeding it at night before bed so that it has a long rise time overnight and can be mixed the next morning. Another option is to feed your starter in the morning, mix it before bed, and then bake it the next morning. It really just depends on your schedule.
Just make sure that 8-12 hours prior to mixing your bread, you feed your starter. For this particular recipe, you’ll want to scoop 2 tablespoons of your starter into a clean jar and then add 1 cup of flour and 1 cup of water.
Ingredients for King Arthur Sourdough
One added bonus of making fresh sourdough bread is that there are very few ingredients needed.
- King Arthur Unbleached All-Purpose Flour
- King Arthur Whole-Wheat Flour
- Water (room temperature)
- Salt
You will need high-quality flour with a protein percentage of at least 11.7%. Most quality flours display protein content on the outside of the packaging. I prefer King Arthur brand flour but I also purchase the Costco brand organic flour and it bakes just as well and is more affordable.

Tools
There are a few tools that make baking sourdough a little easier but most are not necessary.
Weck Jars: My favorite!!
Dutch Oven
Banneton Basket: These are available in different sizes and shapes and are great for shaping your loaves during the bulk rise time.
Parchment Paper: Keeps the bread from sticking to the bottom of the Dutch oven.
Bread Lame: This is for scoring your loaves before baking. You can also use a sharp knife to make your cuts.
Rice Flour: This isn’t necessary, but can be used to sprinkle on top of your loaves before scoring and will make your design more distinct.
Cooling Rack“>Heat-Proof Gloves– Using gloves to move your loaves in and out of the oven is a good idea. Bread bakes at a very high temperature and the slightest touch will burn.
Dough Scraper: A tool used for scraping and lifting the dough.
Serrated Bread Knife: This makes cutting into your loaves so much easier!
How to Make King Arthur Sourdough Bread
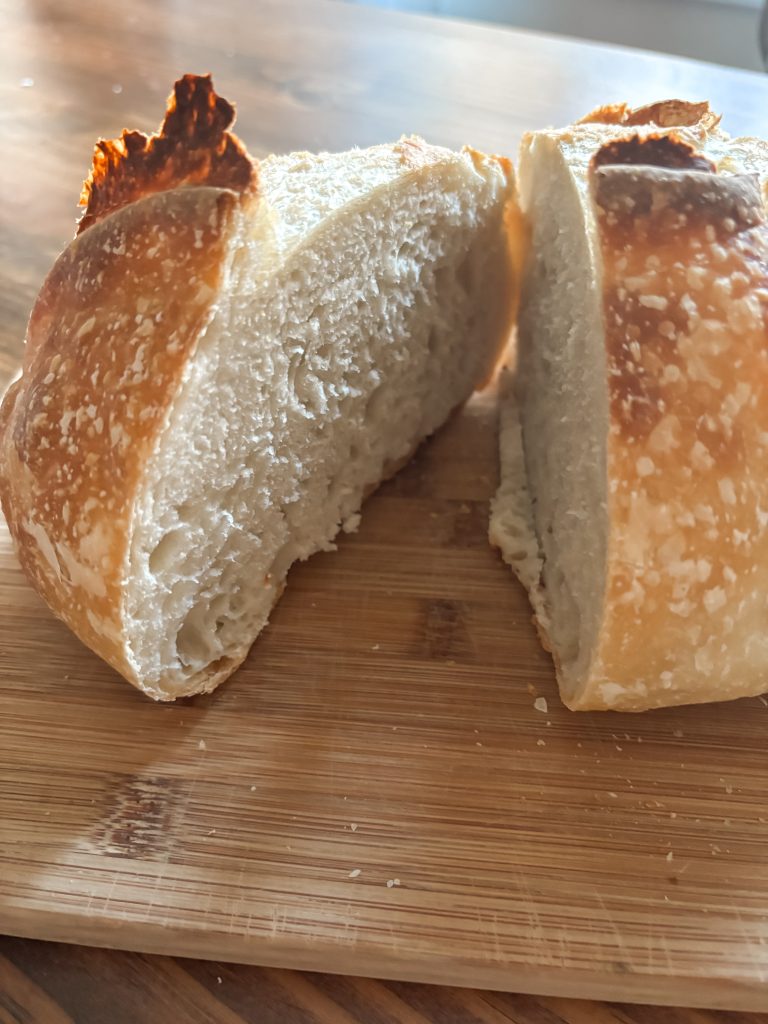
This bread bakes golden brown with a nice crust and perfect flavor. This recipe makes 2 loaves.
Step 1:
12 hours prior to mixing your dough, feed your starter.
Into a clean jar add…
2 tablespoons of starter
1 cup of King Arthur Unbleached All-Purpose flour
1 cup of room-temperature water
Would you like to save this?
Step 2:
After your starter has doubled, place 1 3/4 cups of room-temperature water into a large bowl. Add 2 cups of your active starter to the water and stir. Mix in 5 cups of King Arthur Unbleached All-Purpose flour and 3/4 cup of King Arthur Whole-Wheat flour into your bowl. Mix well until all bits of flour are moistened and you’ve formed a soft tacky dough.
Cover with a damp towel and let rest for 20 minutes.
Step 3:
After letting your dough rest, add 2 1/2 teaspoons of salt and knead the dough for an additional 4-5 minutes. You want a soft dough that’s somewhat tacky. Place the dough back into the bowl, cover with a plate or plastic wrap, and let your dough rise for 1 hour.
Step 4:
After an hour, turn the dough out onto a lightly floured surface. Fold it like a business letter. Then do a quarter turn and fold it again and once more. Place to dough back into the bowl and let it rise for an additional hour.
Step 5:
Turn the dough out onto a floured surface and divide in half with a dough scraper. Gently shape it into two rounds by gently cupping the dough, pulling and twisting it towards you while building surface tension.
Leave each round on the counter and cover with an upside-down bowl. Allow 20 minutes for the rounds to rest. Then, place each round into a fabric-lined banneton basket sprinkled with rice flour. Cover and rise for 2 1/2 hours.
Step 6:
About half an hour before baking, place your empty dutch oven inside the oven and preheat to 450 degrees. At the end of the rising time, turn your rounds out onto a piece of parchment paper. Using a bread lame, razor blade, or sharp knife, make 2 deep diagonal slashes into the rounds. Carry the dough by the corners of the parchment paper like a sling and very carefully place it into the preheated Dutch oven.
Bake with the lid on for 20 minutes. Remove the lid and bake for an additional 20-25 minutes until the crust is golden brown.
*Be sure to preheat again before baking your second loaf.
Allow the bread time to cool on a cooling rack for 1-2 hours before slicing. If you cut into your loaves too early the dough will be gummy.
Storing leftover bread
It’s quite possible to devour an entire loaf at one meal but just in case you have leftover bread there are a few ways you can store it to keep it fresh.
- Place it in a paper bag.
- Wrap it in plastic wrap.
- Store as is but with the sliced side face down on a cutting board.
- Freeze for longer storage by wrapping your loaf tightly in plastic wrap and placing it inside a freezer bag.
Tips for Successful Baking
My greatest tip is to just keep trying. Ugly bread is still yummy! I’ve never had to toss a loaf.
Fermentation (or rise time) is forgiving. If you see that you can’t bake it within the rise time window, you can always slow ferment in the refrigerator.
Sample Baking Schedule
8:00 pm Feed your starter the night before you plan to bake.
8:00 am Mix your dough and let it rest.
9:30 am Fold and turn. Rest for an additional hour.
10:30 am Divide and shape. Rise for 2-3 hours.
1:00 pm Preheat oven and bake!
FAQ’s
Why is my sourdough bread not rising in the oven?
This is most likely because your starter isn’t strong enough. Over time the strength of your starter will increase and you will get a better rise.
Can I use a stand mixer?
Yes, you can use a stand mixer with a dough hook but I caution against it with this type of loaf. Using a stand mixer can cause over mixing which can lead to a bread that’s more dense. For best results, mix and knead using your hands.
What if I want to use only whole wheat flour?
Bread that’s made with 100% whole wheat flour is typically very dense.
Do I have to add whole wheat flour to this recipe?
No, you can replace the 3/4 cup of whole wheat with all-purpose if you like but the small amount of whole wheat gives a nice rise and texture.
I am a huge advocate for just getting started. Not every loaf you bake with be perfect but just like with anything else, you will get better loaves over time. Don’t get caught up in all of the sourdough jargon! Just follow the recipe and you’ll become more knowledgeable over time.
Be sure to check out my NEW Sourdough Basics Video Course and my Sourdough Discard Crash Course!
Helpful Links:
Sourdough Basics Video Course
Establishing a Sourdough Starter
Daily Guide to Creating a Sourdough Starter
Classic King Arthur Sourdough Recipe
Ingredients
For the Leaven
- 2 Tablespoons starter
- 1 cup King Arthur All Purpose Flour
- 1 cup room temperature water
For the Dough
- 2 cups sourdough starter
- 5 cups King Arthur Unbleached All-Purpose Flour
- 3/4 cup King Arthur Whole Wheat Flour
- 1 3/4 cups room-temperature water
- 2 1/2 teaspoons salt
Instructions
For the Leaven
- Combine 2 tablespoons of starter, 1 cup of King Arthur Unbleached All Purpose flour, and 1 cup of room temperature water into a claen jar and stir. Allow it to rise and ferment for 8-12 hours or overnight.
For the Dough
- After your starter has doubled, place 1 3/4 cups of room temperature water into a large bowl. Add 2 cups of your active starter to the water and stir. Mix in 5 cups of King Arthur Unbleached All Purpose flour and 3/4 cup of King Arthur Whole-Wheat flour into your bowl. Mix well until all bits of flour are moistened and you’ve formed a soft tacky dough.
- Cover with a damp towel and let rest for 20 minutes.
- After letting your dough rest, add 2 1/2 teaspoons of salt and knead the dough for an additional 4-5 minutes. You want a soft dough that’s somewhat tacky. Place the dough back into the bowl, cover with a plate or plastic wrap and let your dough rise for 1 hour.
- After an hour, turn the dough out onto a lightly floured surface. Fold it like a business letter. Then do a quarter turn and fold it again and once more. Place to dough back into the bowl and let it rise for an additional hour.
- Turn the dough out onto a floured surface and divide in half with a dough scraper. Gently shape it into two rounds by gently cupping the dough, pulling and twisting it towards you while building surface tension.
- Leave each round on the counter and cover with an upside down bowl. Allow 20 minutes for the rounds to rest. Then, place each round into a fabric lined banneton basket sprinkled with rice flour. Cover and rise for 2 1/2 hours
- About half an hour before baking, place your dutch oven inside the oven and preheat to 450°F. At the end of the rising time, turn your rounds out onto a piece of parchment paper. Using a bread lame, razor blade, or sharp knife, make 2 deep diagonal slashes into the rounds. Carefully remove the dutch oven and place a loaf inside using the parchment paper as a sling. Be careful and replace the lid.
- Bake with the lid on for 20 minutes. Remove the lid and bake for an additional 20-25 minutes until the crust is golden brown.


Very pleased with my loaves!
Lucy I am so happy to hear this! Thanks for sharing 🙂
What can I do to not have the bottom crust so hard and difficult to cut?
Hey Millie! You can slide a baking sheet into the oven on the rack below your dutch oven. This will keep the bottom from burning. Hope this helps!
Put rice in the bottom of your dutch oven, then add your loaf on the parchment paper.
Millie you can place a baking sheet on the rack just below your dutch oven!
When I made the leaven it only made 1 c of starter and the recipe calls for 2.
Hi Joanne! Often times you wont get an exact ammount when making a leaven but don’t worry! Just add what you have to the recipe. In your case, 1 cup will still do the trick!
I make this recipe today, and it turned out great. The one thing I did differently was a cold bake. I put the loaves into the fridge for 2 hours to cool them, put them on parchment paper, sliced the tops and put one into an aluminum Dutch oven and one into a ceramic Dutch oven, placed them into the oven. Baked at 450 for 40 minutes uncovered, and 15 covered. Turned out fabulous! THANKS!
I love this recipe. It makes a wonderful sourdough bread.
So glad you love it!
Hi I’m curious as to why you don’t use bread flour in this recipe. Could I use the king Arthur bread flour instead? Let me know
Thanks!
Lolita
Absolutly Lolita! It’s just not necessary.
Does it male a difference if you shape into a loaf or a round? I prefer a loaf style.
Hi Judie! You can shape the dough into a loaf if you prefer, just know that you will have to adjust baking times!
I don’t normally read through all of the topics in the article and jump straight to the recipe. I followed the steps and couldn’t understand how yo get 2 cups of starter from 1/2 c flour and 1/2 c water. I went back through and read the article and in there it says to use 1 c flour and 1 c water. Unfortunetly it was too late and I had added all the ingredients with not enough starter so it was a total waste and will have to find a different recipe to try tomorrow when my starter replenishes.
Amber I am so sorry. The recipe at the bottom did not have the correct amounts. You will need 1 cup of flour and 1 cup of water. I have corrected my mistake. I apologize and hope you will try it again.
In one section of this recipe iti is stated that for this recipe 1 cup of flour and one cup of water will be added to 2 T of starter, but the recipe for the levan calls for 2T of starter added to 1/2 cup of flour and 1/2 cup of water. Which is the correct? This is somewhat confusing.
Lenore, I’m so sorry for the confusion. I have updated the recipe to correct my mistake. You will need 1 cup of flour and water when feeding your starter. So sorry about this!
What size of a Dutch oven do you use?
Lesli, I have a 7 qt but 5.5 would work just fine!
I only have a smaller size 4 quart Dutch oven. If I want to make a smaller loaf, could I adjust this recipe?
For sure! Or you could divide in half and just make 2 smaller loves.
This is written very confusingly, and the Booklet from KA does not include the leaven part. Is the leaven part in addition to the ripe sourdough starter? Does the leaven replace the starter, the terms are confusing and the usage of one or the other or both is unclear. Could you please clarify?
Hi Jori! I agree the recipe on the KA website does not include leaven so I was sure to add it here. Leaven is ripe starter-it’s starter after it’s been fed and has doubled in size. Hope this helps!
I’m confused by the leaven. Does the 2 tbsp of leaven actually replace the 2 cups of starter or is it in addition to 2 cups of starter? Sorry I’m new to this.
In the beginning instructions it says:
Just make sure that 12 hours prior to mixing your bread, you feed your starter. For this particular recipe, you’ll want to scoop 2 tablespoons of your starter into a clean jar and then add 1 cup of flour and 1 cup of water.
In the recipe part it says 2 T starter and 1/2 cup flour and 1/2 cup water.
Which is right? I’m guessing the 1 cup additions because when I do 1/2 cup of each I don’t get 2 cups of risen starter.
Thanks!
Hi Cindy! I apologize for any confusion. I’ve updated the recipe correcting my mistake. You are correct. Use 1 cup of flour and water to feed your starter. Thank you!
turned out great!
Awesome! So glad!
followed this recipe exactly with the exception of cold fermented after shaping and in banneton, for 16 hrs. Baked as recipe, misted before and after lid off. Did not rise well and could’ve been edible except the overly sour flavor. Baked til 207 and had a great crust, ok crumb. Honestly the amount of starter seems excessive, 1 cup to 3 of flour. Is this the correct recipe? Did the overnight cold kill it?
Hi Linda! This recipe isn’t meant to be long fermented. It’s more a “quick” sourdough as you will see in the timeline of the recipe. I would try the recipe again and follow it step-by-step and see how it goes. 🙂
I’m currently trying this recipe (very excited!) but I had a question about the two loaves. Are you supposed to put both loaves on one parchment and cook them together in the same pot? Do I need two pots? Since I only have one, will it effect it if one loaf sits while the other loaf cooks? Sorry, still pretty new on this journey, looking forward to progressing!!
Hi Tera! You will cook the separately. I would keep one loaf in the fridge while the other one cooks and then bake the second loaf. Excited for you to dive in!
Received by starter 3 days ago and fed her immediately. She’s the most active starter I have ever worked with. Thank you so much! I see lots of King Arthur flour in my future as I continue my sourdough hobby!
Excited for you Melissa!
question: can I bake the dough in pans instead of round in a dutch oven?
Yes! You’ll just want to adjust baking time and temp. Try 425° for about 35 minutes or so.
If loaves are put in 2 different shaped bannetons (round and oblong) and I only have a round dutch oven, can the oblong one be baked by just putting it on a hot stone without being in a vessel? Hope that makes sense.
Makes perfect sense Margaret. And yes, you can bake oblong in a round dutch oven. Happy Baking!